
How to Create a Private Website
By posting anything onto the world wide web, you’re making it available for the world to see. Your boss, that neighbor you can’t stand, or even a random kid from Thailand, all can potentially see everything you post. But what if you want a little privacy? Considering the hyperconnected world we live in today where nearly everything is made public, we can’t blame you. The solution is simple: Create a private website.
A private website is a digital sanctuary where you, your friends, and family can share with one other without attracting unwanted attention from strangers. A good example of someone who could benefit from creating a private website is a new mother who wants to share photos with her family members, but doesn’t want to put the photos out there for the entire world to see – as is the case with social media sites.
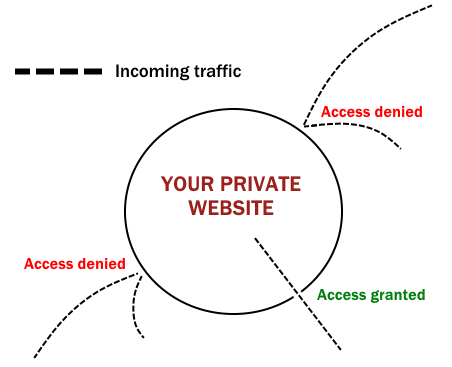
How a private website works. Only grant access to those that you want to have access.
So generally, private websites can be used for:
– A private blog to share photos of family events, weddings, baby pictures, and more sensitive personal information with friends and family.
– A private blog can serve as your own personal diary or journal.
– A team of web creators working on a project can use a private website as a way to collaborate in secret.
– A private website can simply be used to house a website that is still “under construction” and not ready for the public.
– A private website can be used as a teaching tool where registered students and educators can meet and discuss.
– Marketers can use semi-private or fully private websites as a way to restrict content and make consumers want something more.
– You can start your own private community message board where only invited members can gain access.
There are dozens of reasons why someone might want to privatize their blog, or at least portions of it, from the scrutiny of the outside world. Whether it’s for personal or business reasons, just know that creating a private website doesn’t have to be forever.
And before we jump into tips, suggestions, and strategies for starting your own private website, you first need to understand the many differing levels of privacy that are available to you.
Just How “Private” Is Online Sharing?
No matter how many extra steps you take to ensure your website is completely private, and even if you take precautionary steps to ensure your name is never attached to the website, just know that there’s always a chance that someone somewhere has the ability to link you to a piece of online media. In short, obtaining complete online privacy is difficult, if not downright impossible.
Anonymous Website vs. Private Website

An anonymous website occurs when a site’s creator wants no visible or hidden connections between the website’s content and themselves. Creating an anonymous website requires several mundane steps, such as: using a proxy service to register a domain, using Tor, using an anonymous IP and email address, and taking additional steps – both online and in the real world – to ensure your identity is completely detached from the website. An anonymous website takes time and resources to create, but ultimately it’s the best way to express yourself without fear of backlash for your views or opinions.
Creating a private website, on the other hand, is much more practical for the casual internet user. With a private website, you’re not trying to dodge every bit of revealing code that can lead to your identity. Instead, you probably just want more control over how you share information with others, with the added benefit of increasing your personal privacy.
The following will detail step-by-step how you can effectively create a private website using popular blogging platforms like WordPress and Tumblr.
Setting Up a Private WordPress Website

These privacy suggestions (excluding plugins) can be made to both WordPress.com and WordPress.org blogs. WordPress is great because it’s a state-of-the-art content management system (CMS) that’s completely free and offers multiple layers of privacy for users.
If you want complete privacy, the first thing you have to do is get a reliable offshore web hosting provider. While there may be a variety of options on the market, our hosting reviewers believe AbeloHost is the best hosting provider for private websites.
Their hosting plans are not only reliable and secure, they also host all your data in a private offshore location, making sure you have complete anonymity. The best part? The starter plan that you need to launch a website will set you back as much as a cup of coffee – just 5.99 EUR per month.
Click the link below to find out more.

The next thing you can do to privatize your WordPress blog is to prevent the major search engines from indexing your website into their search engine database – although the website will still be accessible through the direct URL.
To do this, simply go to your WordPress dashboard and select > Settings > Reading > Check the box that reads Discourage search engines from indexing this site.
Before publishing a blog post through the WordPress dashboard, you can choose the post’s visibility status as Public, Private, or Password Protected (if you use any of the following plugins). If you want to allow only certain people to read the content’s of a web page, check off the Password Protected box.
If you want to add an additional layer of privacy to your new WordPress website, then you need to use plugins. WordPress plugins help extend the functionality of your WordPress site, and with a nearly endless list to choose from, you have a few options. But unfortunately plugins are only available to WordPress.org site’s, not free WordPress.com blogs.
And before we list these privacy plugins, keep in mind that if WordPress themes and plugins are not built well, they can cause plugin conflicts. Plugin conflicts can cause your entire website to not function properly, so just make sure the code is up to date and compatible with your version of the WordPress platform.
Elegant Themes Shortcode Feature
Elegant Themes, a very popular WordPress theme creator, has their own shortcode that allows users to password protect pages. To login to a web page, the user would need the correct user name and password. All-in-all it’s very simple to use – and convenient if you’re already using one of their themes.
Absolute Privacy Plugin
The Absolute Privacy plugin prevents posts from popping up in RSS feeds. It also allows you to fully customize your WordPress login page or even lock down a website entirely. You can choose to privatize or publicize posts on a page-by-page basis. But because the plugin hasn’t been updated in over 2 years, use it only if you’re desperate.
More Privacy Options Plugin
This helpful plugin can set different privacy settings for a WordPress Multisite network. Multiple websites can be set to Network Users Only, Site Members Only, or Site Admins Only.
Private Content Plugin
The Private Content plugin is able to restrict portions of articles or entire pieces of content. The great thing about this plugin is that you can block off content mid-post using a shortcode that only certain users can see. So if you’re showing off your new baby photos to the entire world, for instance, you can hide the best stuff for privileged friends and family.
Simple Download Monitor Plugin
This easy-to-use plugin password protects downloadable files. You would use this plugin in a scenario where you would want to make a page public, but want to make downloads available only to specific users. This is a great way to send out private files to employees, such as hour log sheets, sales information, and other stuff you wouldn’t want your competitors or strangers to see.
“Coming Soon” Plugins
Coming Soon plugins are another useful way to help hide website information. In theory these plugins are meant for websites still in development. The plugin simply produces a one-page design that essentially let’s users know your website is not yet live. There are dozens of these types of plugins in the WordPress.org repository, and it’s easy to work around the Coming Soon page by creating a separate section of your site that only certain users can access.
More things to consider when making a private WordPress site
First thing’s first: Find a good hosting provider who specializes in both WordPress and in keeping their customer’s information confidential. Some web host’s specialize in anonymity, while some do not even require personal information from their customers. You’ll also want a WordPress hosting provider who provides free anti-DDoS protection and takes security seriously.
Aside from choosing a reliable web host, you will also want to set up your website’s Robots.txt file. More specifically, if you plan on hiding parts of your website, such as sensitive areas like your login pages, you’ll want to understand how to create and configure a Robots.txt file.
Setting Up a Private Tumblr Blog

If you’re looking for a hassle-free way to quickly set up a free private blog, odds are you’ve considered Tumblr as a viable option. The process is fairly simple. First, you’ll need to create a standard public blog since Tumblr doesn’t allow your default blog to be password protected and private. Simply leave the first blog with a generic name, theme, and no content.
Now, add a second blog to serve as your private site. Click on the arrow next to the blog’s name and select Create a new blog. Select a name and URL address for the new blog, and then check off the box with the words Password protect this blog, and then enter a new password. Now simply click on Create Private Blog. And that’s basically it!
With your new private Tumblr blog, you can post pictures, videos, quotes, and links as you wish – all content is hidden beneath your password protected firewall. The only way to visit your private Tumblr blog and see its contents is by entering the direct URL address and designated password, which you can share with friends, family, or whoever you wish. The password protection feature can be removed at any time.
Privatizing a website doesn’t have to be a painstaking process made entirely for undercover agents, everyone can use these tools to enhance their online privacy. Hopefully this post gave you some insight into how to create a private website using popular CMS’s. The above tips and suggestions can easily be made to other popular content platforms like Blogger or Weebly.